In the world of microcontrollers and electronics, LCD (Liquid Crystal Display) screens are essential for visualizing data and creating user interfaces. In this post, we will explore how to connect and use LCD displays with an Arduino. We’ll also dive into the LiquidCrystal library and provide practical examples to get you started.

Section 1: Understanding LCD Displays and the LiquidCrystal Library
LCD Basics: LCD displays compatible with the Hitachi HD44780 driver are widely used in the electronics community. These displays typically feature a 16-pin interface and offer a parallel interface, which means the microcontroller must manage several interface pins simultaneously. Key pins on these displays include RS (Register Select), R/W (Read/Write), Enable, data pins (D0-D7), and others for power supply and backlight control.
LiquidCrystal Library: To simplify LCD control, the LiquidCrystal library is your go-to tool. It abstracts the low-level communication with the display, allowing you to focus on what you want to show rather than how to send individual commands. The library supports both 4-bit and 8-bit modes for Hitachi-compatible LCDs, with 4-bit mode being sufficient for most text-based applications.
Section 2: Hardware Setup
Components Required: Before you start working with LCD’s and Arduino, gather the following components:
- Arduino Board
- LCD Screen 16×2 (HD44780 compatible)
- Pin headers for soldering
- 10k ohm potentiometer
- 220 ohm resistor
- Hook-up wires
- Breadboard
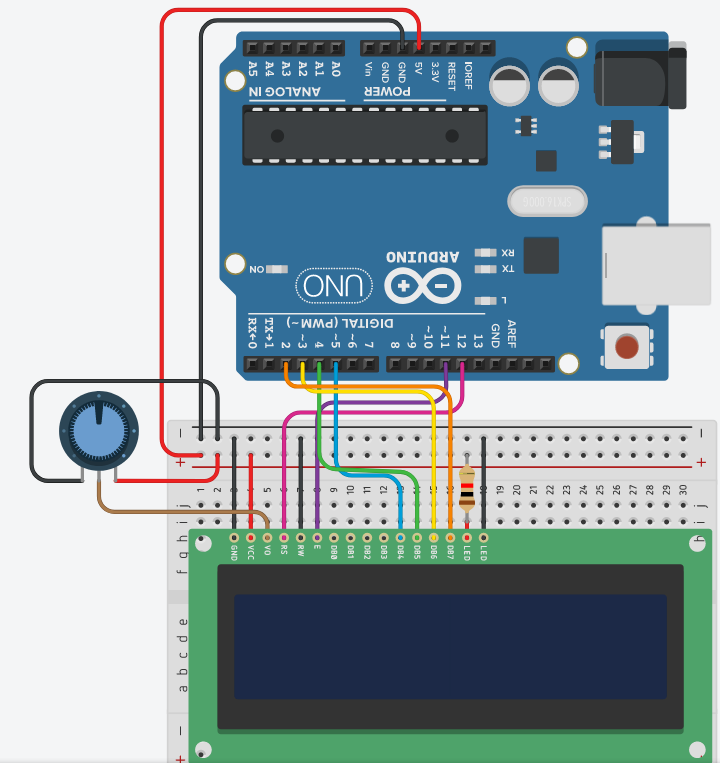
Circuit Wiring: Ensure proper connections between the LCD screen and your Arduino board. Although the following pin connections are based on the Arduino UNO, adapt them if using a different board. Here are the connections:
- LCD RS pin to digital pin 12
- LCD Enable pin to digital pin 11
- LCD D4 pin to digital pin 5
- LCD D5 pin to digital pin 4
- LCD D6 pin to digital pin 3
- LCD D7 pin to digital pin 2
- LCD R/W pin to ground (GND)
- LCD VSS pin to ground (GND)
- LCD VCC pin to +5V
- LCD LED+ to +5V through a 220 ohm resistor
- LCD LED- to ground (GND)
Additionally, connect a 10k potentiometer to +5V and GND, with its wiper (output) connected to the LCD screen’s VO pin (pin 3).

Section 3: Hello World Example
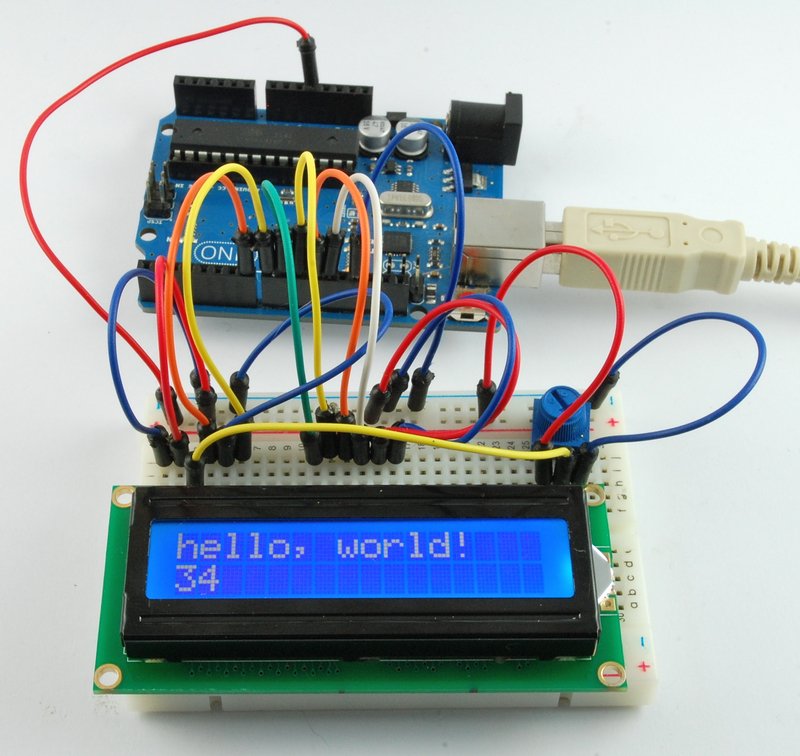
Code Example: Let’s start with a simple “Hello World!” example using the LiquidCrystal library. This sketch displays the message on the LCD and shows the time in seconds since the Arduino was reset.

This example demonstrates the basics of initializing the LCD and printing text.

Section 4: Additional LCD Control Examples
In the next sections, we’ll explore more LCD control examples, including:
- Autoscroll Example
- Blink Example
- Cursor Control Example
- Display Control Example
- Text Direction Scroll Example
- These hands-on examples that will enhance your understanding of LCD displays and Arduino.
Autoscroll Example:

Blink Example:

Cursor Example:

Display Example:

Scroll Example:

These examples should help you get started with using the LiquidCrystal library to control LCD displays with your Arduino. You can customize and modify these sketches to suit your specific needs and integrate them into your projects so why don’t we do a few lessons on these to help you to master the LCD LiquidCrystal library coding!
Lesson 1: Autoscrolling Text on an Arduino LCD Display
Introduction: In this lesson, we’ll explore how to create an autoscrolling text effect on an Arduino LCD display using the LiquidCrystal library. Autoscrolling is a neat visual effect often used in applications like news tickers or information displays.
Code:

Explanation:
- We include the LiquidCrystal library and define the pins for the LCD connections.
- In the
setup()function:- We initialize the LCD with 16 columns and 2 rows.
- Print “Autoscrolling:” on the first row.
- Move the cursor to the second row.
- Enable autoscrolling.
- Use a loop to continuously print spaces, creating the autoscroll effect.
- Disable autoscrolling when the loop completes.
- The
loop()function is empty since we don’t need it for this example.
Use Case: This autoscrolling effect can be used in projects where you want to display continuously updating information, such as stock market data, news headlines, or system status messages.
Lesson 2: Blinking Text on an Arduino LCD Display
Introduction: In this lesson, we’ll learn how to make text blink on an Arduino LCD display using the LiquidCrystal library. Blinking text can be used to draw attention to important information or warnings in your projects.
Code:

Explanation:
- We include the LiquidCrystal library and define the LCD pins.
- In the
setup()function:- Initialize the LCD.
- Print “Blinking:” on the first row.
- Move the cursor to the second row.
- Enable text blinking.
- Wait for 3 seconds.
- Disable text blinking.
- The
loop()function is empty in this example.
Use Case: Blinking text is useful when you want to indicate an alert or draw attention to specific information, such as a low battery warning or a critical system error message.
Lesson 3: Adding a Cursor to an Arduino LCD Display
Introduction: In this lesson, we’ll explore how to add a cursor to an Arduino LCD display using the LiquidCrystal library. A cursor is a visual indicator that shows the current text insertion point.
Code:

Explanation:
- We include the LiquidCrystal library and define the LCD pins.
- In the
setup()function:- Initialize the LCD.
- Print “Cursor:” on the first row.
- Move the cursor to the second row.
- Enable the cursor.
- Wait for 3 seconds.
- Disable the cursor.
- The
loop()function remains empty.
Use Case: Adding a cursor is useful when you want to interact with the LCD display, such as for text input or menu selection in various projects like digital thermometers or simple calculators.
Lesson 4: Controlling Display On/Off on an Arduino LCD
Introduction: In this lesson, we’ll learn how to control the display’s visibility on an Arduino LCD using the LiquidCrystal library. This feature allows you to turn the display on and off as needed.
Code:

Explanation:
- We include the LiquidCrystal library and define the LCD pins.
- In the
setup()function:- Initialize the LCD.
- Print “Display:” on the first row.
- Turn on the display.
- Wait for 3 seconds.
- Turn off the display.
- Wait for 3 seconds.
- Turn the display back on.
- The
loop()function is empty for this example.
Use Case: Controlling the display on/off is useful for saving power or for creating interactive projects where you want to reveal information only when needed, such as in weather stations or fitness trackers.
Lesson 5: Scrolling Text on an Arduino LCD Display
Introduction: In this lesson, we’ll dive into scrolling text on an Arduino LCD display using the LiquidCrystal library. Scrolling text is commonly used to display longer messages or information within limited screen space.
Code:

Explanation:
- We include the LiquidCrystal library and define the LCD pins.
- In the
setup()function:- Initialize the LCD.
- Print “Scrolling:” on the first row.
- Wait for 1 second.
- Scroll the text left in a loop, creating a left-scrolling effect.
- Scroll the text right in a loop, creating a right-scrolling effect.
- Reset the cursor position to the home position.
- Wait for 1 second.
- The
loop()function is empty for this example.
Use Case: Text scrolling is beneficial when you need to display longer messages or information that doesn’t fit entirely on the LCD screen. You can use it in projects like digital signage displays or message boards.
These blog lessons should provide a comprehensive overview of how to use various features of the LiquidCrystal library to control an Arduino LCD display. Each lesson includes code explanations and practical use cases to help Arduino enthusiasts and beginners understand and apply these concepts in their projects. Next is the adding the ‘void Loop’ part to your LCD programming.
Adding the ‘void loop’
Next we’ll go thru loop examples for each of the Arduino LCD display lessons we discussed in the previous lessons. These loop examples will demonstrate how to integrate the specific functionality into an ongoing loop. Let’s now go through each one:
Loop Example 1: Autoscrolling Text on an Arduino LCD Display
Lesson Recap: In the autoscrolling text lesson, we created an autoscrolling effect for the LCD display. Let’s see how to integrate this into a loop:

Explanation: In the loop() function, we continuously update the LCD display with a dynamic value, such as a sensor reading. The lcd.autoscroll() function is called once in the setup() function, so the scrolling effect remains active while the loop updates the displayed information.
Loop Example 2: Blinking Text on an Arduino LCD Display
Lesson Recap: In the blinking text lesson, we learned how to make text blink on an LCD display. Here’s how you can integrate it into a loop:

Explanation: In the loop() function, we use lcd.blink() and lcd.noBlink() to toggle the text blinking effect on and off. In this example, we toggle the blinking every second, but you can adapt this to your specific project requirements.
Loop Example 3: Adding a Cursor to an Arduino LCD Display
Lesson Recap: In the cursor lesson, we added a cursor to the LCD display. Here’s how you can incorporate it into a loop:

Explanation: In the loop() function, we control the cursor’s position by using lcd.setCursor(). In this example, we move the cursor back and forth between positions (8, 1) and (0, 1) every second. You can modify this to suit your project’s needs.
Loop Example 4: Controlling Display On/Off on an Arduino LCD
Lesson Recap: In the display on/off lesson, we learned how to control the LCD display’s visibility. Here’s how you can manage it within a loop:


Explanation: In the loop() function, we toggle the display on and off by using the lcd.display() and lcd.noDisplay() functions. In this example, we switch the display state every 3 seconds, but you can adjust the timing as needed for your project.
Loop Example 5: Scrolling Text on an Arduino LCD Display
Lesson Recap: In the text scrolling lesson, we scrolled text on the LCD display. Here’s how you can make it part of a loop:

Explanation: In the loop() function, we use lcd.scrollDisplayLeft() and lcd.scrollDisplayRight() to scroll the text left and right, creating a continuous scrolling effect. Adjust the delays and scrolling range to suit your project’s requirements.
These loop examples demonstrate how to incorporate the specific functionalities we discussed in the previous lessons into your Arduino projects. You can adapt these examples and integrate them into various applications based on your project’s needs.
Be sure to check out – Creating a Scrolling Text Display on a 16×4 LCD – this gives you 4 lines of text to play with instead of 2! You can apply all you have learned here on a 16×4 LCD or bigger! Try it! Have fun!
Be sure to subscribe below to the Electrified Life newsletter for the latest articles on projects and ways that you too can work from home as a blogger!
We won’t send you spam. Unsubscribe at any time
